本地搜索
1 | npm install --save hexo-generator-search |
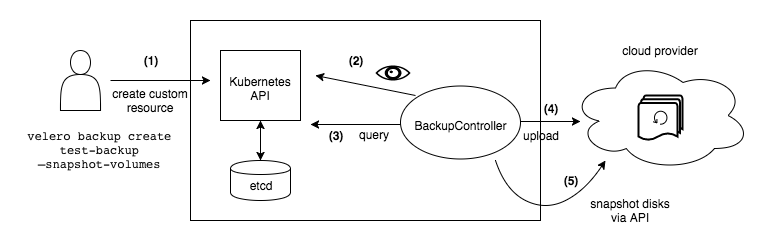
https://velero.io/docs/v1.14/how-velero-works/
fluent-bit
[INPUT]
    name              tail
    path              /var/lib/docker/containers/**/*.log
    path_key         path
    multiline.parser  docker, cri
    Parser docker
    Docker_Mode  On

[INPUT]
    Name     syslog
    Listen   0.0.0.0
    Port     5140
    Parser   syslog-rfc3164
    Mode     tcp

[SERVICE]
    Flush        1
    Parsers_File parsers.conf
    HTTP_Server  On
    HTTP_Listen  0.0.0.0
    HTTP_PORT    2020


## https://zincsearch-docs.zinc.dev/ingestion/fluent-bit/
[OUTPUT]
    Name  es
    Match *
    Path /api
    Index syslog
    Type  journal
    Host local.org
    Port 4080
    Generate_ID On
    HTTP_User admin
    HTTP_Passwd cs#123

[FILTER]
    Name parser
    Match *
    Key_Name data
    Parser syslog-rfc3164
1 | ❯ ./vmctl-linux-amd64 prometheus --help |
- –vm-concurrency: 导入数据并发线程。
- –vm-batch-size: 每批大小。
- –prom-concurrency: 同时运行的快照读取器个数。
- –prom-filter-time-start: 选择时间戳大于等于所提供值的时间序列。例如:2020-01-01T20:07:00Z
- –prom-filter-time-end: 选择时间戳小于等于指定值的时间序列。例如:2020-01-01T20:07:00Z
- –prom-filter-label: 过滤标签。例如:‘_name_’ 按名称过滤。
- –prom-filter-label-value: 过滤值的正则,默认 ‘*’。
- –vm-addr: 执行导入请求的VictoriaMetrics地址。导入到集群版本时,不要忘记另外设置–vm-account-id标志。
- –vm-compress: 是否压缩,默认true。
- –vm-rate-limit:数据传输速率,单位:bytes/s,默认(0)关闭。
开启  --web.enable-admin-api
---
version: '3.8'
services:
  prometheus:
    image: prom/prometheus:v2.54.1
    container_name: prometheus
    volumes:
      - "/mnt/lvm/oss/tdb/prometheus:/prometheus:rw"
    command:
      - "--config.file=/etc/prometheus/prometheus.yml"
      - "--storage.tsdb.path=/prometheus"
      - "--web.enable-admin-api"
      - "--storage.tsdb.retention.time=3d"
      - "--storage.tsdb.retention.size=1GB"
      - "--storage.tsdb.wal-compression"
    ports:
      - "9090:9090"
快照请求
1 | ❯ curl -XPOST http://localhost:9090/api/v1/admin/tsdb/snapshot |
account
1 | ❯ curl -u vmselect:vmselect123 https://vmselect.local.org/admin/tenants -k |
http://local.org:18480/metrics
vm_tenant_inserted_rows_total{type=”promremotewrite”,accountID=”0”,projectID=”0”} 129585
迁移